
AC Compressor Replacement Cost: 2026 Homeowner Guide
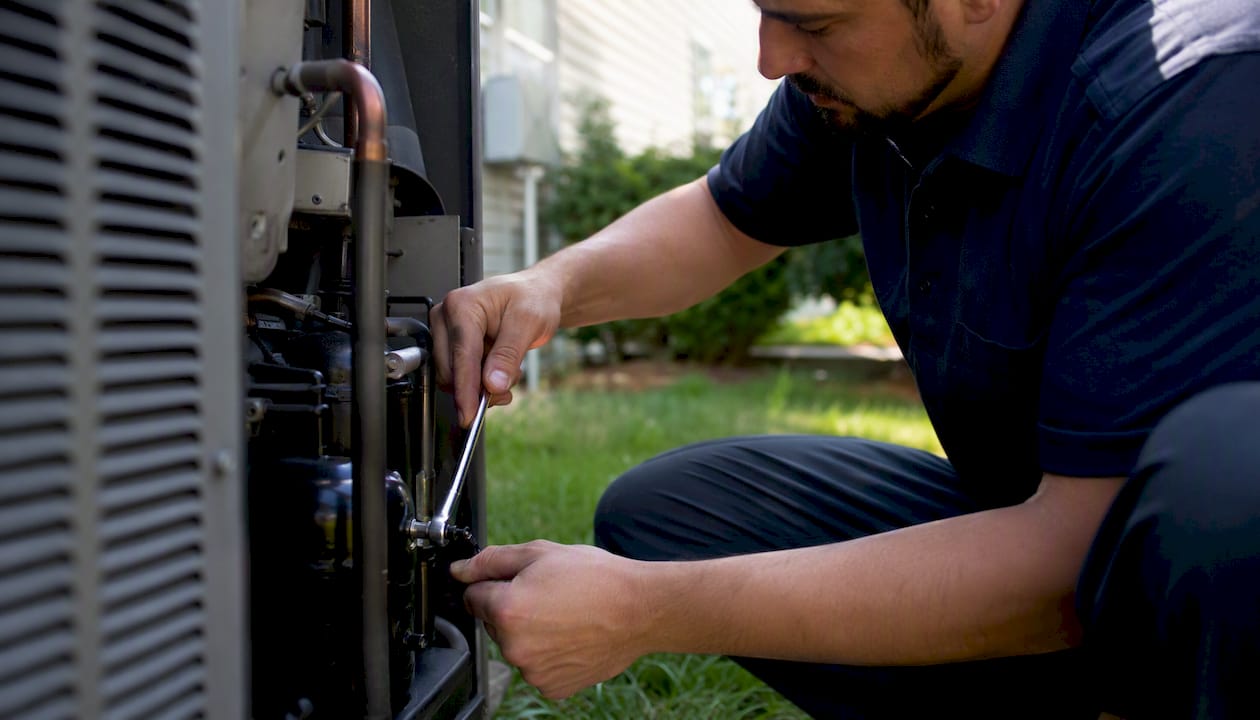
Most homeowners pay between $800 and $2,300 to replace an AC compressor, with a national average near $1,550, according to This Old House’s 2026 data. The part itself typically runs in the mid-range cost bracket, and labor also contributes a significant portion to the total cost. If your compressor is still under the manufacturer’s parts warranty, you may only be responsible for labor costs, which significantly reduces the out-of-pocket expense.
- Parts only: $500–$1,500
- Labor only (warranty covers part): $300–$600
- Fully installed (parts + labor + refrigerant): $800–$2,300 for most homes; up to $3,000 for larger or complex systems
- National midpoint: roughly $1,550–$1,600
Verdict: Replacing the compressor makes financial sense when your system is under 10 years old, the part is under warranty, and no other major components are failing. If your system runs on R-22 refrigerant or is 12–15 years old, a full system replacement often costs less over time than patching an aging unit.
Key Takeaways
Most homeowners pay $800–$2,300 installed for an AC compressor replacement in 2026, with a national midpoint near $1,550; systems over 12 years old or running on R-22 refrigerant are usually better candidates for full replacement.
| Point | Details |
|---|---|
| National cost range (2026) | Most homeowners pay $800–$2,300 installed; complex or large systems can reach $3,000. |
| Replace vs. full system rule | If repair cost × 2 exceeds a new system quote, or the system is 12+ years old on R-22, replace the whole unit. |
| Warranty check first | A manufacturer parts warranty covering the compressor reduces your cost to labor only, typically $300–$600. |
| Refrigerant impact | R-22 recharges add $250–$750+ to repair costs; R-410A adds $100–$350 under normal conditions. |
| Ricottaheatingandair | Serves St. Louis and Jefferson County with EPA-certified technicians, itemized quotes, and honest repair-vs.-replace guidance. |
Table of Contents
- How much does AC compressor replacement cost by system type and tonnage?
- What type of compressor do you have, and how does it affect the price?
- What do labor rates and installation factors add to your bill?
- How do refrigerant type and EPA rules change your repair cost?
- Should you replace the compressor or the whole AC system?
- What are the signs your compressor is failing?
- What other repairs come up during a compressor replacement?
- How can you reduce what you pay for a compressor replacement?
- What happens during a compressor replacement, step by step?
- What should you ask your HVAC contractor before agreeing to any work?
- A local perspective from Ricottaheatingandair
- Honest, local HVAC service when your compressor fails
- Sources
How much does AC compressor replacement cost by system type and tonnage?
System type and size are the two biggest variables in your quote. A window unit compressor costs a fraction of what a central split system requires, and a 5-ton commercial-grade residential unit costs significantly more than a 2-ton starter system.
By system type
Angi’s cost guide confirms the $800–$2,300 installed range for most residential systems, with part-only prices varying by tonnage and compressor type.
By tonnage
Tonnage tells you how much cooling capacity your system has. One ton equals 12,000 BTUs per hour. Most homes run 2–4 tons.
Reading a contractor quote: a quick example
Say you have a 3-ton central split system. A typical itemized quote might look like this:
- Compressor part: $850
- Labor (5 hours at $120/hr): $600
- Refrigerant recharge (R-410A, 3 lbs): $150
- Filter drier replacement: $75
- Total: $1,675
That falls squarely within the expected range. If a quote comes in significantly higher with no explanation for each line item, that’s worth questioning.
What type of compressor do you have, and how does it affect the price?
The compressor type inside your outdoor unit affects both part cost and long-term efficiency. Here’s how the main types break down:
- Scroll compressors: The most common type in modern residential systems. Quieter and more efficient than older designs. Part cost typically $500–$1,200. Found in most Carrier, Trane, and Lennox systems built after 2000.
- Reciprocating (piston) compressors: Older technology, still found in budget systems and older units. Part cost $300–$800. Less efficient but widely available.
- Rotary compressors: Common in smaller systems and mini-splits. Part cost $200–$700. Compact and reliable for lower-tonnage applications.
- Two-stage compressors: Run at two capacity levels, cutting energy use during mild weather. Part cost $700–$1,400. Found in mid-tier Goodman, Amana, and Rheem systems.
- Variable-speed (inverter) compressors: The most efficient option, adjusting output continuously. Part cost $1,000–$2,000+. Standard in premium Lennox, Carrier, and Trane lines.
Brand price differences
Brand matters more than most homeowners expect. Ricottaheatingandair services all major brands, and the price spread between budget and premium lines is real:
- Goodman and Amana (sister brands) tend to have lower part costs, $400–$900, making them budget-friendly repair candidates.
- York and Coleman (also sister brands under Johnson Controls) sit in the mid-range, $500–$1,100.
- Rheem compressors typically run $500–$1,100 and are widely stocked.
- Carrier, Trane, and Lennox are premium brands with part costs often $700–$1,500, reflecting tighter tolerances and proprietary components.
Upgrading compressor type during a replacement is possible, but it requires matching refrigerant compatibility, electrical specs, and physical fit. A two-stage or variable-speed upgrade can reduce long-term energy bills, but the upfront cost premium needs to pencil out against your system’s remaining lifespan. Energy recommends factoring efficiency payback into any major repair decision.
What do labor rates and installation factors add to your bill?
Labor is the part of the quote that varies most by region and job complexity. Nationally, HVAC technicians charge $75–$150 per hour, with most compressor swaps taking 4–8 hours of technician time. Many shops quote a flat fee for a standard compressor replacement, typically $300–$800, rather than billing hourly.
A straightforward ground-level central split swap on a 3-ton system with easy access usually lands at the lower end of that labor range. Several factors push it higher:
- Rooftop or attic-mounted units require additional time for safe access and often a two-person crew.
- Brazing (the torch-welding process used to connect refrigerant lines) takes skill and time; shops that do it properly charge for it.
- Refrigerant evacuation and recharge adds 30–60 minutes and requires certified equipment.
- Hard-to-reach outdoor units surrounded by landscaping, fencing, or tight utility corridors add time.
- Older systems with corroded fittings or non-standard connections slow every step of the job.
Pro Tip: When you get a quote, ask specifically whether it includes refrigerant recovery and recharge, brazing, a new filter drier, and a pressure test. A quote that omits any of these is incomplete, and those line items will show up as surprises on the final invoice.
How do refrigerant type and EPA rules change your repair cost?
Refrigerant is where a seemingly straightforward compressor replacement can get expensive fast, especially on older systems.
EPA Section 608 requires any technician handling refrigerants to hold EPA 608 certification and to recover refrigerant properly during any repair. This is not optional. A shop that skips refrigerant recovery is violating federal law, and you should walk away from that quote.
The refrigerant your system uses has a direct impact on what a compressor replacement actually costs you in 2026. R-22 (Freon), phased out of production under the Montreal Protocol, now costs $50–$150 per pound on the secondary market, compared to $10–$25 per pound for R-410A. A system needing 5 lbs of R-22 recharge adds $250–$750 to the repair bill before labor. The AIM Act is also accelerating an HFC phasedown that affects R-410A availability and pricing going forward, which means even modern systems face rising refrigerant costs over time.
For R-22 systems specifically, the math often shifts the decision entirely. If your system is more than 12 years old, runs on R-22, and needs a compressor, you’re paying a premium for a refrigerant that’s getting harder to source every year. EPA’s HFC transition guidance confirms that production limits on HFCs are tightening, which puts upward pressure on recharge costs for both R-22 and R-410A systems.
HomeAdvisor reports that refrigerant recharge typically adds $100–$350 to a repair, but R-22 systems can push that figure considerably higher. When refrigerant costs alone approach $500–$700, a full system replacement running $3,500–$7,000 starts to look like the smarter long-term investment.
Should you replace the compressor or the whole AC system?
This is the question most homeowners actually need answered. Here’s a practical checklist to work through before you commit to either path:
- How old is your system? Systems under 10 years old are generally worth repairing. At 12–15 years, you’re likely replacing it within a few years anyway. At 15+ years, a full replacement usually wins on total cost.
- Is the compressor under warranty? Most manufacturers cover the compressor for 5–10 years. If the part is covered, you pay labor only, which changes the math significantly.
- What refrigerant does it use? R-22 systems are a strong signal to replace the whole unit. R-410A systems have more repair runway, though the AIM Act phasedown is worth watching.
- Are other parts failing? A compressor failure alongside a failing evaporator coil, condenser coil, or aging air handler means you’re stacking repairs on a declining system.
- Apply the cost-threshold rule: If the repair cost multiplied by two exceeds the price of a new system, replace the system. For example, a $1,800 compressor repair × 2 = $3,600. If a new system costs $4,500–$6,000, the repair still makes sense. But if the repair is $2,500 and a new system is $4,800, you’re close enough that efficiency gains from a new high-SEER2 unit tip the balance toward replacement.
- What efficiency gain would a new system deliver? Replacing a 10-SEER system with a modern 18-SEER2 unit can cut cooling energy costs by 30–40%. Over 10 years in a St. Louis summer, that adds up.
When the compressor is under warranty and the system is under 10 years old with no other failing parts, repair is almost always the right call. When two or more of the above flags are red, air conditioning installation is worth pricing out alongside the repair quote.
What are the signs your compressor is failing?
Your AC system usually gives you warning signs before the compressor quits entirely. Knowing what to look for helps you catch the problem early and ask the right questions when a technician arrives.
Common symptoms of a failing compressor:
- No cool air with the fan still running. The air handler blows, but the air is warm or only slightly cooler than ambient. This is the most common compressor failure symptom.
- Loud grinding, clicking, or rattling from the outdoor unit. A healthy compressor hums steadily. Grinding suggests internal mechanical wear; clicking on startup can point to a failing capacitor or the compressor struggling to start. If you’re hearing unusual sounds, this guide to AC noises breaks down what each one typically means.
- Visible oil stains or refrigerant leaks around the compressor or refrigerant lines.
- Frequent circuit breaker trips when the AC starts. A compressor drawing too much current will trip the breaker repeatedly.
- The outdoor unit starts but shuts off quickly (short-cycling), or the compressor clutch won’t engage on systems where that applies.
What a technician checks during diagnosis:
- Refrigerant pressure readings on both the high and low sides using manifold gauges
- Electrical draw (amperage) compared to the compressor’s rated load
- Capacitor and contactor condition
- Leak detection with an electronic leak detector or UV dye
- Visual inspection of the compressor body, refrigerant lines, and electrical connections
A professional diagnostic visit typically costs $75–$150, and many shops credit that fee toward the repair if you proceed. If you’re already troubleshooting a system that isn’t cooling, a diagnostic is the logical next step before authorizing any repair.
What other repairs come up during a compressor replacement?
A compressor doesn’t fail in isolation. When a technician opens up your system, they often find related components that need attention. Knowing the typical cost of each helps you evaluate whether a recommendation is legitimate or an upsell.
| Add-On Repair | Typical Cost Range | Why It’s Often Needed |
|---|---|---|
| Refrigerant recharge (R-410A) | $100–$350 | Required after any compressor swap |
| Filter drier / receiver-drier | $50–$150 | Mandatory after brazing; prevents moisture contamination |
| Capacitor replacement | $50–$200 | Often fails alongside or before the compressor |
| Contactor replacement | $50–$150 | Electrical wear component; cheap insurance |
| TXV (thermostatic expansion valve) | $150–$400 | Controls refrigerant flow; sometimes damaged by a failed compressor |
| Evaporator coil cleaning or repair | $100–$600 | Dirty coils reduce efficiency and can cause pressure issues |
| Condenser coil cleaning | $75–$200 | Dirty condenser coils stress the new compressor |
| System flush | $100–$300 | Removes debris and acid from refrigerant lines after a burnout |
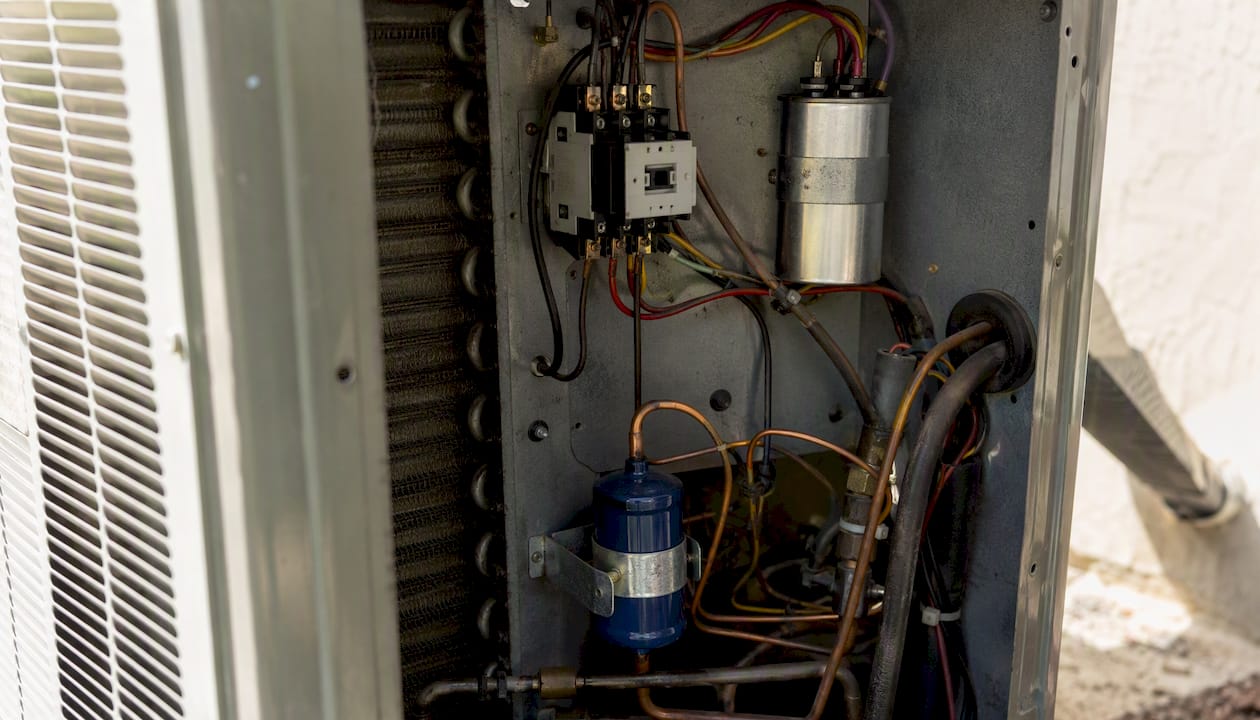
The filter drier is non-negotiable after any brazing work. Brazing introduces moisture and flux into the refrigerant circuit, and a new filter drier catches that contamination before it reaches the compressor. Any shop that skips this step is cutting corners that will cost you later.
Pro Tip: Ask for a fully itemized written quote before work begins. If a line item says “miscellaneous repairs” or “other parts” without specifics, ask the technician to name every component and its individual cost. Vague line items are where surprise charges hide.
How can you reduce what you pay for a compressor replacement?
There are real ways to lower the bill without compromising the quality of the repair.
- Check your warranty first. Most compressors carry a 5–10 year manufacturer parts warranty. Pull your system’s model and serial number (on the data plate of the outdoor unit), find your original installation date, and check whether you registered the unit. Some brands require registration within 60–90 days of installation to activate the full warranty term. If the part is covered, you pay labor only.
- Get 2–3 written, itemized estimates. Prices for the same job can vary $400–$800 between shops. Compare line by line: part cost, labor hours, refrigerant quantity and type, and any add-ons. A lower total with fewer line items often means something is being left out.
- Time it right. HVAC shops are busiest in June, July, and August. Scheduling a non-emergency replacement in spring or fall often comes with faster availability and occasionally a lower price.
- Ask about financing. Many HVAC contractors offer 12–18 month financing options, which can make a larger repair or replacement manageable without draining savings.
- Consider a maintenance plan. A service agreement that includes annual tune-ups keeps refrigerant levels correct, catches capacitor wear early, and reduces the likelihood of a compressor failure in the first place.
- What NOT to do: Never attempt DIY refrigerant work. Purchasing, handling, or venting refrigerants without EPA 608 certification is a federal violation. Beyond the legal risk, compressor replacement requires brazing equipment, a vacuum pump, and manifold gauges that most homeowners don’t own. Hiring an unlicensed technician who won’t provide EPA-compliant paperwork exposes you to liability and voids most manufacturer warranties.
What happens during a compressor replacement, step by step?
Knowing the job flow helps you set realistic expectations and verify that your technician is doing the work correctly.
- Inspection and diagnostic. The technician confirms compressor failure through pressure readings, electrical tests, and visual inspection before ordering parts.
- Refrigerant recovery. Using certified recovery equipment, the technician removes all refrigerant from the system. This step is required by EPA Section 608 and cannot be skipped.
- System flush (if needed). If the compressor failed due to a burnout, acid and debris contaminate the refrigerant lines. A flush removes this before the new compressor goes in.
- Brazing and installation. The old compressor is disconnected and removed. The new unit is positioned, refrigerant lines are brazed (torch-welded) into place, and electrical connections are made.
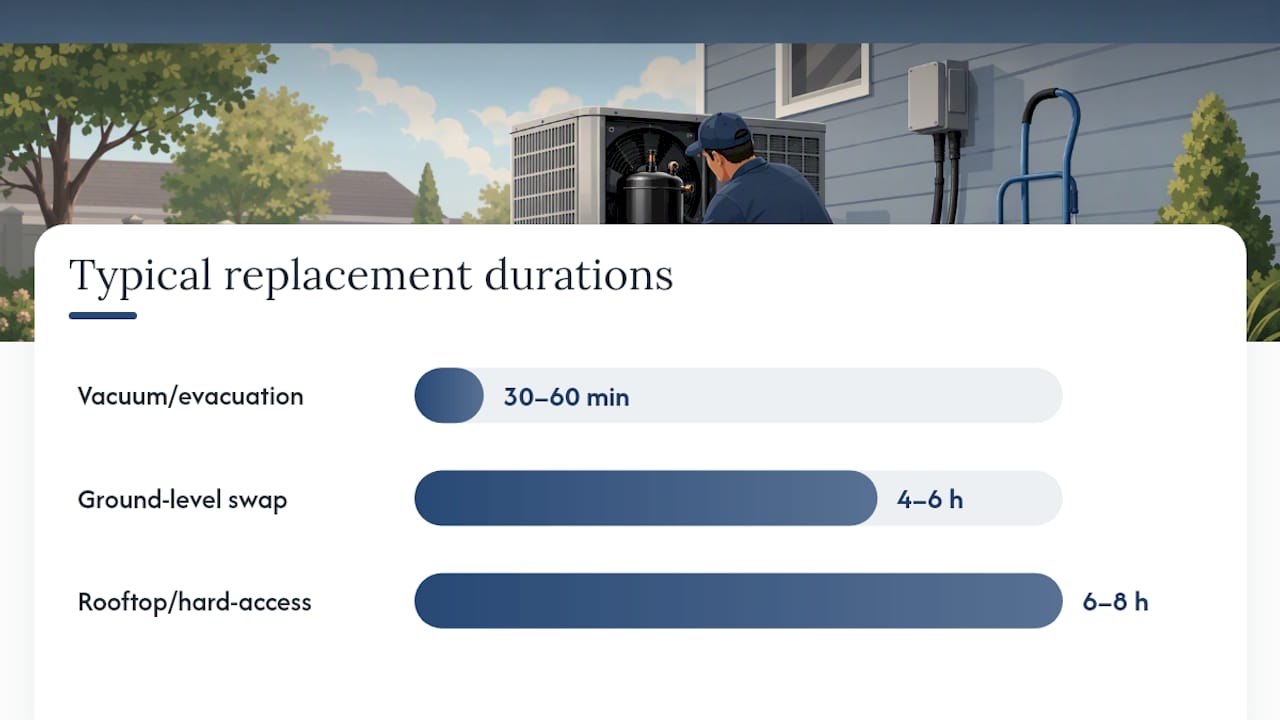
- Vacuum/evacuation. A vacuum pump pulls the system down to remove air and moisture from the refrigerant circuit. This step typically takes 30–60 minutes and is critical for system longevity.
- Refrigerant recharge. The correct refrigerant type and weight (measured in pounds) are charged into the system per manufacturer specifications.
- Leak test and run test. The technician checks all connections for leaks, then runs the system to verify pressures, temperatures, and electrical draw are within spec.
A straightforward swap on a ground-level central split system typically takes 4–6 hours. Rooftop units, systems requiring a two-person lift, or hard-to-access outdoor units can push the job to 6–8 hours or require a second visit if parts need to be ordered.
Homeowner prep checklist: Clear a 3-foot path to the outdoor unit, turn off the system at the thermostat, arrange pets away from the work area, and confirm someone 18+ is home for the full duration of the job.
What should you ask your HVAC contractor before agreeing to any work?
Choosing the right technician matters as much as the repair itself. Here’s what to ask and what to watch for.
- Are you EPA 608 certified? Any technician handling refrigerants must hold this certification. Ask to see it, or verify the company’s credentials.
- Are you licensed and insured in Missouri? Confirm the contractor carries liability insurance and is properly licensed for HVAC work in your state.
- What does the warranty cover? Get specifics: how long is the parts warranty on the new compressor, and does the shop offer a labor warranty? One year on labor is standard; less than that is a red flag.
- What refrigerant will you use, and how much? The technician should be able to tell you the refrigerant type and the manufacturer-specified charge weight before starting.
- Can I get a fully itemized written quote? Every line item, part, labor hour, and refrigerant charge should appear in writing before you authorize the job.
- What’s the expected timeline? Will this be completed in one visit, or do parts need to be ordered?
Red flags to watch for:
- A technician who suggests venting refrigerant rather than recovering it
- Quotes with vague line items like “parts and labor” as a single number
- Demands for large cash payments upfront before any work begins
- No physical business address, no license number, or unwillingness to provide references
- Pressure to approve additional repairs on the spot without written explanation
Documents to collect after the job: an itemized invoice showing every part and its cost, the refrigerant type and weight charged, warranty paperwork for both parts and labor, and a direct contact number for follow-up service questions.
A local perspective from Ricottaheatingandair
Working with homeowners across St. Louis and Jefferson County for 50 years, we see compressor failures most often in July and August, right when you need your system most. The national cost ranges in this guide hold true locally: most of our customers pay $900–$2,100 for a fully installed compressor replacement, depending on system size and refrigerant type. R-22 systems are where we consistently recommend full replacement rather than repair, because the refrigerant cost alone often makes the repair economically irrational. Our technicians are EPA 608 certified, and we provide fully itemized quotes before any work begins. With 150+ five-star Google reviews and deep familiarity with the brands common in this area, including Goodman, Carrier, Trane, Lennox, Rheem, York, Coleman, and Amana, we give you a straight answer on whether repair or replacement is the right call for your home.
Honest, local HVAC service when your compressor fails
When your AC goes down in a St. Louis summer, you need a straight answer fast, not a sales pitch. Ricottaheatingandair sends EPA-certified technicians who diagnose the problem accurately, give you a fully itemized written quote, and tell you honestly whether a compressor replacement or a full system swap makes more financial sense for your home.

Our diagnostic visit covers pressure testing, electrical checks, refrigerant assessment, and a clear recommendation with pricing. We service all major brands and carry parts for Goodman, Carrier, Trane, Lennox, Rheem, York, Coleman, and Amana systems. Ask about our HVAC maintenance plans to keep your system running efficiently and catch small problems before they become compressor failures. Ready to schedule? Book your diagnostic with Ricottaheatingandair today.
Sources
- Epa
- Energy
- How Much Does an AC Compressor Cost? (2026 Guide)
- ac compressor cost — Angi
- AC compressor replacement cost — HomeAdvisor
- AC Compressor Replacement Cost (2026 Prices)